Table of contents
shibd will clutter the log file with many deprecation warnings.
This guide describes how to configure the Shibboleth Service Provider (SP) 3.4 for usage in the Switch edu-ID Federation or AAI Test federations.
Only the configuration of the Service Provider is covered. If the Service Provider has not yet been installed, first follow the Service Provider 3.4 Installation Guide.
If you have an existing Service Provider that used an older version of Shibboleth, you should perform a clean configuration using this guide or alternatively, you could also try to upgrade the old configuration according to the Switch Shibboleth SP Migration Guide.
sudo for commands that require root privileges.
mod_ssl to support HTTPS. By default, the SAML assertions containing user attributes are encrypted, so one could send them via the insecure HTTP protocol. However, successfully authenticated users accessing a web page via HTTP are prone to session hijacking attacks.
The following software must be installed in order to operate a Shibboleth Service Provider.
sudo. Ensure that you have root privileges on the system.
OpenSSL is required.
Before continuing to the next section, please ensure that the requirements above are met on the system where the Shibboleth Service Provider is installed on.
If you are in a hurry and know the whole setup process, you can download all configuration files directly.
Store the following files into the configuration directory /etc/shibboleth/:
/etc/shibboleth/shibboleth2.xml
/etc/shibboleth/SWITCHaaiRootCA.crt.pem
/etc/shibboleth/attribute-map.xml
/etc/shibboleth/attribute-policy.xml
The Shibboleth daemon (shibd) needs an X.509 keypair for signing and encrypting SAML messages. Switch recommends to use a dedicated self-signed certificate, independently configured from the SSL/TLS certificate used by the Web server. Checkout the Certificate Overview to better understand the role the certificates play in this context.
The web server can use any certificate for providing TLS/SSL. In addition, the Shibboleth SP also needs a keypair with a certificate for signing and decrypting messages. The Service Provider can either use the same certificate as is used for the web server (provided it meets the SWITCHaai Certificate Acceptance Policy) or one can create an independent self-signed certificate for usage by the Shibboleth SP only. Switch recommends to use a long-lived, self-signed certificate for usage by the Shibboleth SP.
keygen.sh (Red Hat Enterprise, Rocky, CentOS):
sudo /etc/shibboleth/keygen.sh -f -u shibd -h yourhost.example.org -y 10 -o /etc/shibboleth/Or with
shib-keygen (Debian, Ubuntu):
sudo shib-keygen -f -u _shibd -h yourhost.example.org -y 10 -o /etc/shibboleth/Or by manually generating a self-signed certificate with OpenSSL
C:\opt\shibboleth-sp\etc\shibboleth\keygen.bat -f -h yourhost.example.org -y 10 -o C:\opt\shibboleth-sp\etc\shibboleth\
sp-cert.pem and private key named sp-key.pem in the /etc/shibboleth/ directory.
openssl x509 -in /etc/shibboleth/sp-cert.pem -text -noout
C:\'Program Files'\Shibboleth\SP\lib\openssl.exe x509 -in C:\opt\shibboleth-sp\etc\shibboleth\sp-cert.pem -text -noout
This chapter describes how to configure the Shibboleth Service Provider for usage in the federation.
In this section all the federation-specific configuration files are downloaded and deployed. In particular shibboleth2.xml, the main configuration of the Shibboleth Service Provider. The name was not changed despite incrementing the major version number for SP v3.
curl (or your web browser) to download the Shibboleth main configuration file shibboleth2.xml to the configuration directory:
sudo curl --output /etc/shibbolethshibboleth2.xml 'download/customize.php/shibboleth2.xml'
C:\'Program Files'\Shibboleth\SP\lib\curl.exe --output C:\opt\shibboleth-sp\etc\shibbolethshibboleth2.xml 'download/customize.php/shibboleth2.xml'Open the
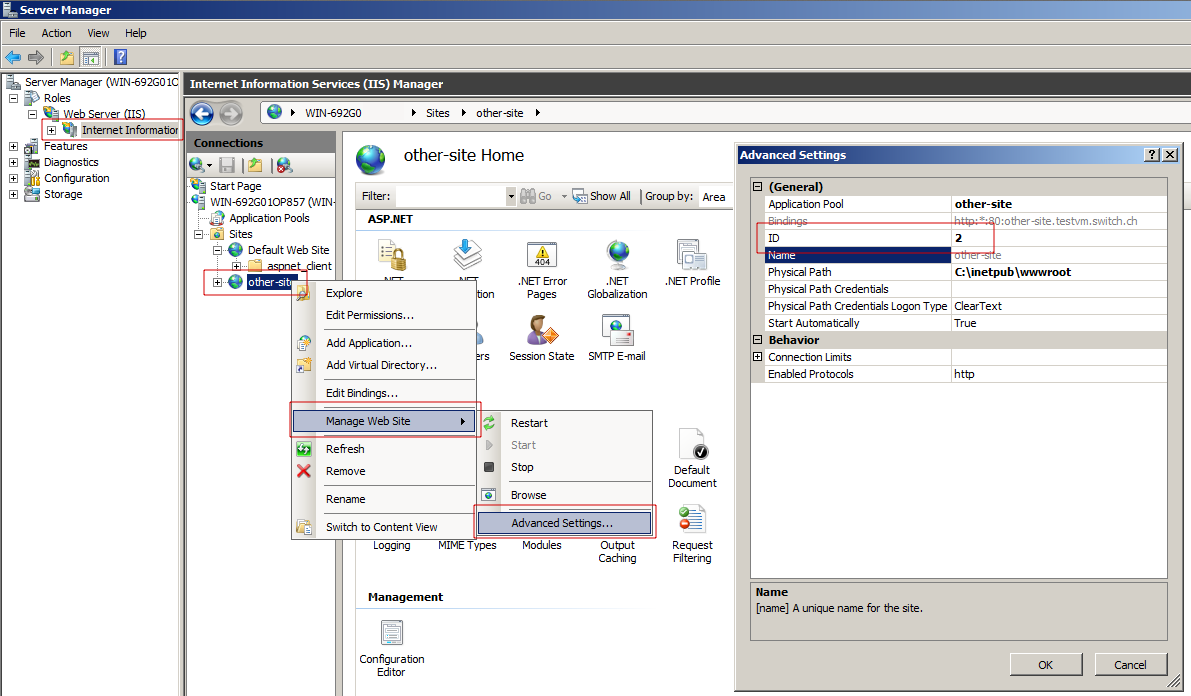
shibboleth2.xml file and review the Shibboleth configuration. You might want to change some settings for more advanced use cases like defining multiple Shibboleth applications.<Site> element and its id value. Shibboleth requires the site ID value. The site id for the default IIS Site is one 1, which is also the default value used in the Shibboleth configuration. For all other Sites, the site ID can be seen via the Site Advanced Settings
There are two more federation-specific files that need to be deployed for the proper attribute handling in the federation.
curl (or your web browser) to download the attribute-map.xml file to the configuration directory:
sudo curl --output /etc/shibbolethattribute-map.xml 'download/customize.php/attribute-map.xml'
C:\'Program Files'\Shibboleth\SP\lib\curl.exe --output C:\opt\shibboleth-sp\etc\shibbolethattribute-map.xml 'download/customize.php/attribute-map.xml'The
attribute-map.xml file defines which attributes the Service Provider will be able to handle and under which name they are made available to web applications.
curl (or your web browser) to download the attribute-policy.xml file to the configuration directory:
sudo curl --output /etc/shibbolethattribute-policy.xml 'download/customize.php/attribute-policy.xml'
C:\'Program Files'\Shibboleth\SP\lib\curl.exe --output C:\opt\shibboleth-sp\etc\shibbolethattribute-policy.xml 'download/customize.php/attribute-policy.xml'The
attribute-policy.xml file defines which attributes and which values the Service Provider will accept from which Identity Provider. Attributes and values that don't match the rules are filtered out by the Service Provider.
In order to validate the federation metadata files downloaded by the Service Provider
curl (or your web browser) to download the root certificate to the configuration directory:
sudo curl --output /etc/shibboleth/SWITCHaaiRootCA.crt.pem http://ca.aai.switch.ch/SWITCHaaiRootCA.crt.pem
C:\'Program Files'\Shibboleth\SP\lib\curl.exe --output C:\opt\shibboleth-sp\etc\shibboleth\SWITCHaaiRootCA.crt.pem http://ca.aai.switch.ch/SWITCHaaiRootCA.crt.pem
shibboleth-sp\sbin\ directory of your Shibboleth installation.openssl x509 -in /etc/shibboleth/SWITCHaaiRootCA.crt.pem -noout -fingerprint -sha256
C:\'Program Files'\Shibboleth\SP\lib\openssl.exe x509 -in C:\opt\shibboleth-sp\etc\shibboleth\SWITCHaaiRootCA.crt.pem -noout -fingerprint -sha256
The SHA-256 fingerprint should match exactly:
SHA256 Fingerprint=37:DC:E4:D7:1C:24:42:32:6A:0F:85:B6:12:00:22:C7:54:AA:FF:B2:8C:BF:CF:69:EB:F3:F7:31:90:3C:09:5AThe Metadata Provider configuration in the
shibboleth2.xml file refers to the local copy of the SWITCHaai Root CA certificate as trust root:
<MetadataProvider type="XML"
validate="true"
url="http://metadata.aai.switch.ch/metadata.switchaai%2Bidp.xml"
backingFilePath=""
reloadInterval="3600">
<MetadataFilter type="RequireValidUntil"
maxValidityInterval="604800"/>
<MetadataFilter type="Signature" verifyBackup="false" >
<TrustEngine type="StaticPKIX"
certificate="SWITCHaaiRootCA.crt.pem"
verifyDepth="2"
checkRevocation="fullChain"
policyMappingInhibit="true"
anyPolicyInhibit="true">
<TrustedName>SWITCHaai Metadata Signer</TrustedName>
<PolicyOID>2.16.756.1.2.6.7</PolicyOID>
</TrustEngine>
</MetadataFilter>
<MetadataFilter type="EntityRole">
<RetainedRole>md:IDPSSODescriptor</RetainedRole>
<RetainedRole>md:AttributeAuthorityDescriptor</RetainedRole>
</MetadataFilter>
</MetadataProvider>
/var/cache/shibboleth/C:\opt\shibboleth-sp\var\cache\shibboleth\. This differs from previous installations where the metadata file used to be in the configuration directory /etc/shibboleth/.
After the configuration a quick test shows whether the Service Provider was installed properly.
sudo shibd -t
C:\opt\shibboleth-sp\sbin\shibd.exe -checkIf the last line of the output is the following message, everything is as expected:
overall configuration is loadable, check console for non-fatal problemsIf there are any
ERROR messages, it is strongly recommended to have a look at the problem.WARN are generally unproblematic. Anyhow, it is recommended to examine the problem. E.g. since SPv3.3 the MetadataGenerator handler causes a WARN Shibboleth.DEPRECATION : MetadataGenerator handler message. The MetadataGenerator handler is useful for the initial registration in the Resource Registry with the SAML2 metadata wizard. Thereafter, consider to disable this handler in shibboleth2.xml to suppress the message.shibd daemon to activate the configuration changes applied above.
sudo apache2ctl configtestor
sudo apachectl configtestThe output of either of these commands should be:
Syntax OK
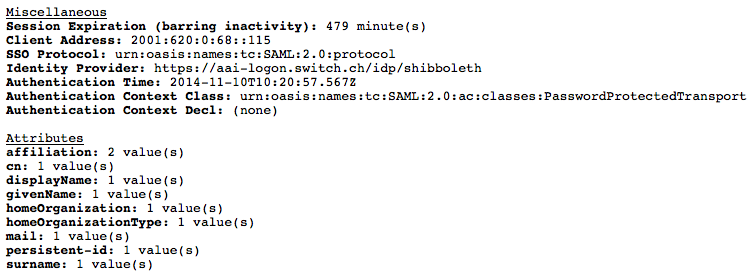
A valid session was not found.This message demonstrates that the Shibboleth module is loaded by the webserver and is communicating with the
shibd process.404 Not found error message instead, check out the Properly Routing Handler URLs section in the Shibboleth Wiki.
To integrate the Service Provider into the federation, it needs to be registered with the Resource Registry, so that its metadata is added to the officially distributed federation metadata. This step is a prerequisite for successfully communicating with the identity providers in the federation.
Run Shibboleth wizard and provide the URL https://yourhost.example.org/Shibboleth.sso/Metadata as metadata handler URL.incomplete. Some forms are optional but it still is recommended to complete them.
Submit for Approval.If you need additional guidance on how to register the Service Provider with the Resource Registry, please also have a look at the Resource Registration Screencast.
After the Resource Description in the Resource Registry was approved by an RRA administrator, you have to wait two hours before you can continue (to allow the Identity Providers to download the latest metadata). You can then test whether the Service Provider is correctly deployed by accessing the Session Initiator Handler URL.
Now you should be able to use Shibboleth to perform access control and to use SAML attributes in your web applications as is described in the following.
<Location /my-directory/>
  AuthType shibboleth
  ShibRequestSetting requireSession true
  Require shibboleth
</Location>
Microsoft IIS:
RequestMap element in shibboleth2.xml like below to make IIS activate Shibboleth for the directory my-directory and its subdirectories.
<Host name="yourhost.example.org">
    <Path name="my-directory" authType="shibboleth" requireSession="true" />
</Host>
If the access via Shibboleth did not work as expected, find below some instructions on how to debug problems.
In case of problems, it is best to try these steps.
sudo shibd -t
C:\opt\shibboleth-sp\sbin\shibd.exe -checkIf the last line of the output is the following message, everything is as expected:
overall configuration is loadable, check console for non-fatal problemsIf there are any
ERROR messages, it is strongly recommended to have a look at the problem. Messages with log level WARN are generally not problematic but it also is recommended to examine the problem.shibd daemon to activate them.
/var/log/shibbolethC:\opt\shibboleth-sp\var\log\shibboleth\.
The exact location of the log files is defined in the shibd.logger configuration file.lesswith a text editor like Notes, scroll down to the end of the log file and locate messages with the log level ERROR or WARN.
log4j.rootCategory) in shibd.logger to DEBUG. This results in a much more verbose output after a restart of the Service Provider.WARN or INFO once the issue has been resolved. Otherwise Shibboleth might remove older messages from the log files to keep the log files at a fixed maximum size.
No return endpoint available for relying party after authentication
Unable to resolve any key decryption keys after authentication
Can't connect to listener process
mod_shibIIS Shib module cannot communicate with the shibd process. Either because shibd is not running (check that the process is running), because SELinux in enforcing mode blocks it or because they use different configuration files (e.g. /etc/shibboleth/shibboleth2.xml and /opt/local/etc/shibboleth/shibboleth2.xml).systemd fails to start or restart shibd
systemd, starting or restaring the shibd process might timeout and fail. Loading and verifying very large SAML Metadata files could be the cause, namely on interfederation enabled SPs. Read Increase startup timeout in the Shbboleth Wiki.
In case you don't understand or don't find the cause of the error, have a look at the Shibboleth Wiki Common SP Errors web page or contact eduid-support@switch.ch.
*.html can all be found in the configuration directory /etc/shibboleth. The most important templates are: accessError.html, attrChecker, localLogout and sessionError. In these templates one can use various parameters that are made available by the Service Provider. Have a look at the Shibboleth Template documentation.
URL: index.html
Author: eduid-support@switch.ch