Table of contents
shibd.log for deprecation warnings for legacy configuration elements.
This guide describes the installation of a Shibboleth Service Provider (SP) 3.4 on the operating systems Windows and Linux/Unix as supported by the Shibboleth Consortium. The instructions are generic, not federation specific.
We did not test the SP on all OS versions, so please report any issue you encounter.
Check and confirm the Shibboleth SP 3 System Requirements before proceeding.
Select the type of operating system on the host where the Shibboleth Service Provider gets installed:
If you use a Linux distribution not listed above that includes an up-to-date Shibboleth SP package, you can try to install that one.
If the Service Provider is already installed, please continue to our federation-specific Switch Shibboleth Service Provider Configuration Guide.
Note for Debian and Ubuntu installations that used the former pkg.switch.ch repository:
As previously announced, the https://pkg.switch.ch/switchaai/ repository is no longer available. Use the packages from the official Debian and Ubuntu distribution channels.
To remove the SWITCHaai package repository from your system, uninstall
packages shibboleth and switchaai-apt-source, then remove any
remaining APT configuration for this repository (if any). This won't
uninstall the Shibboleth SP and the currently-installed SWITCHaai
SP packages will remain until a newer version is available from the
distribution's official repository.
apt remove shibboleth
apt-mark manual libapache2-mod-shib
apt purge switchaai-apt-source
rm /etc/apt/trusted.gpg.d/SWITCHaai-swdistrib.gpg /etc/apt/sources.list.d/SWITCHaai-swdistrib.list
apt update
The Shibboleth project maintains its own shibboleth repository that provides the official Shibboleth Service Provider binaries and its dependencies for RPM-based Linux distributions. This repository contains always up-to-date version of the Shibboleth Service Provider. Therefore, prefer this repository and its packages over packages that may be provided by the OS distribution.
The following software is optional but recommended to be installed for installation and operation of the Service Provider.
ntp, chrony or some other time synchronisation mechanism.
sudo for commands that require root privileges. sudo can be installed with:
yum install sudo
dnf install sudo
curl but of course you can also use wget or another tool. Just replace the curl commands in the following instructions with the tool you prefer using. Curl can be installed with:
sudo yum install curl
sudo dnf install curl
mod_ssl to support HTTPS. By default, the Shibboleth messages containing user attributes are encrypted. Therefore, they can also be sent via the insecure HTTP protocol. However, any session-based access to a web page via the insecure HTTP is prone to session hijacking attacks. This also includes the Shibboleth session. Relying on HTTPS mitigates this risk.
Before continuing to the next section, please ensure that the requirements above are met on the system where the Shibboleth Service Provider will be installed.
Install the Shibboleth Service Provider.
shibboleth repository and install the RPM package, then come back here to proceed,
shibboleth package.
shibd daemon:
sudo systemctl start shibd.service
sudo systemctl enable shibd.service
.msi file from the Shibboleth software repository. Either the 64 bit version or 32 bit version. Please check also the Installation Guide of the Shibboleth Wiki.

C:\opt\shibboleth-spShibboleth 3 Daemon) should have Status = Started, Startup Type = Automatic, Logon As = Local System.
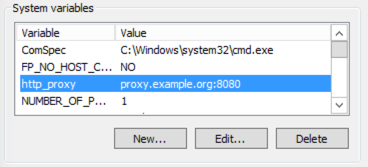
Executable = C:\opt\shibboleth-sp\lib\shibboleth\isapi-shib.dll for a 32-bit install. If the status is unknown, use a web browser to open the URL of your web site. Often this will force the Shibboleth ISAPI filter to be activated./etc/sysconfig/shibdexport http_proxy=proxy.example.org:8080
The Service Provider should now be installed on the system. Of particular interests are the directories:
/etc/shibbolethC:\opt\shibboleth-sp\etc\shibboleth
shibboleth2.xml.
/var/log/shibbolethC:\opt\shibboleth-sp\var\log\shibboleth
shibd.log file that should be consulted in case of problems.
/run/shibboleth
C:\opt\shibboleth-sp\var\run\shibboleth
/var/cache/shibboleth
C:\opt\shibboleth-sp\var\cache\shibboleth
%SYSTEMROOT%\System32\inetsrv\iis.msc%SYSTEMROOT%\System32\eventvwr.msc%SYSTEMROOT%\System32\lusrmgr.msc%SYSTEMROOT%\System32\services.mscAfter the installation a quick test shows whether the Service Provider was installed properly.
sudo shibd -tFor Red Hat Enterprise Linux:
sudo LD_LIBRARY_PATH=/opt/shibboleth/lib64 shibd -t
C:\opt\shibboleth-sp\sbin\shibd.exe -checkImportant is that the last line of the output is:
overall configuration is loadable, check console for non-fatal problems
ERROR log entries, it is strongly recommended to have a look at the problem.WARN are generally not problematic but it is recommended to examine the causes of these warning messages.
sudo apachectl configtestThe output of this command should be:
Syntax OK
https:///Shibboleth.sso/Session. A valid session was not found.This message shows that the Shibboleth module is loaded by the webserver and is communicating with the
shibd process.
After the above tests were successful, continue to the Shibboleth SP configuration. Note that the configuration and migration guides are only for Switch edu-ID Participants who configure a Service Provider for the Switch edu-ID Federation (or the AAI Test Federation). In all other cases refer to the configuration pages in the Shibboleth Wiki.
shibboleth2.xmlCopyright: Switch Author: aai@switch.ch URL: index.html